Getting Started With Flycheck + Pylint in emacs
Posted by krystof on 24 Oct 2014
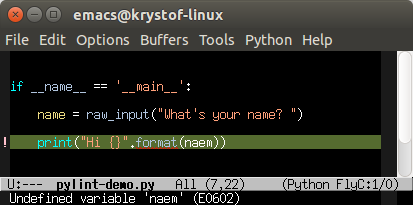
emacs is my favorite editor, and python is my favorite scripting language. Sometimes, though, silly syntax errors in python don’t get caught until runtime, which is a really inefficient way of finding them.
This post is a guide in getting started with pylint inside emacs. Pylint does finds syntax and other issues, so you can spot and fix them as soon as you make them. It can also be used to enforce style guides, notably pep8. With the Flycheck emacs extension, pylint’s output will be shown right inside your emacs buffers.
Requirements:
- emacs version 24 or newer
- package manager set up for emacs (I use MELPA - see here for instructions on setting it up)
- these instructions were tested on Ubuntu, but may work on other systems as well.
Step 1: Install Pylint & Flycheck
Installing pylint is easy on Ubuntu:
sudo apt-get install pylint
Installing Flycheck should also be easy through emacs’ package manager. For my setup with MELPA, I can see all the available packages by doing
M-x package-install RET flycheck
inside emacs. The final step is to enable Flycheck. You can either do it for the current buffer (M-x flycheck-mode), for the current emacs session (M-x global-flycheck-mode), or permanently enable it globally by adding the following line to your .emacs file:
(add-hook 'after-init-hook #'global-flycheck-mode)
If you now restart emacs and open a python file, flycheck should show you pylint’s output for the file.
If you run into any issues, look here for Pylint installation instructions, and here for the Flycheck installation guide.
For me, pylint was way too pedantic. Let’s look at how you can disable some specific errors and warnings.
Step 2: Tell Pylint not to be so pedantic
You can configure pylint by using a pylintrc file. I put mine in ~/.pylintrc:
pylint --generate-rcfile >.pylintrc
You can disable whatever warnings and errors you want by adding the appropriate codes to the “disable=” line in your .pylintrc file. The full list of codes is here.
Obviously, which ones to disable is a matter of preference. For now, I’ve set mine to
disable= C0326, W0621, C0111, C0103, W0702, W0703, C0321, W0511, W0102, R0913,
         R0914, R0915, R0912, R0902, R0903, C0303, C0302, C0325, W0401
I’ve also upped the maximum number of characters allowed per line to 120 characters by max-line-length=120.
And that’s it! Emacs should now be a much more powerful python editor for you.
Why You Should Use Class Enums in C++
Posted by krystof on 17 Apr 2014
This is a brief post about what class enums are in C++, and why you should use them.
The Problem: Enums Pollute Global Scope
Here’s a conflict you might get when using enums:
enum computer_state { ON = 0 , OFF, STANDBY };
enum disco_ball     { OFF = 0, ON };

int state = ON; //CONFLICT - this won't compile
Old School Solutions
Here are two solutions for the above conflict:
enum computer_state { COMPUTER_STATE_ON = 0, COMPUTER_STATE_OFF, COMPUTER_STATE_STANDBY };
enum disco_ball     { DISCO_BALL_OFF = 0, DISCO_BALL_ON };

int state = DISCO_BALL_ON;
The above works, but it is messy, and requires you to be dilligent in naming your values consistently. Here’s a solution with a cleaner result:
namespace computer_state { enum type { ON  = 0, OFF, STANDBY } ; }
namespace disco_ball     { enum type { OFF = 0, ON }; }

int state = disco_ball::ON;
The result above is much cleaner, but the syntax to define it is a little clunky.
The C++11 Solution: Class Enums
This is why C++11 defined the class enum. Here’s how to use it:
enum class computer_state { ON  = 0, OFF, STANDBY };
enum class disco_ball     { OFF = 0, ON };

//the compiler won't allow implicit type conversion here - we need to cast the value to an int
int state = static_cast<int>(disco_ball::ON);
Here we get the same clean access, and the syntax to define the enums is nice and clean as well. That’s why you should be using class enums wherever you’ve been using enums in the past!
How to Have Multiple Versions of OpenCV Side by Side
Posted by krystof on 09 Mar 2014
This tutorial will show you how you can have different versions of the same library side by side such that it’s easy to change which version your code uses.
For example, I work a lot with OpenCV, the computer vision library. I like to be able to try out different features in the trunk version of the library, but prefer to use a stable release in production settings. It’s actually pretty easy to have both versions on your computer, and select which one you’d like to use at compile time.
The following assumes you’re on a Linux machine. I’ll use OpenCV as an example, but the concept applies to any library.
Set up Both Versions of OpenCV
The big idea is that you don’t want to “install” OpenCV into the system’s default directories (/usr/lib or /usr/local/lib), since each version would place itself into an “opencv” directory, creating a big ol’ mess.
I like to have a “libs” directory right under my home directory. In this directory, create a separate directory for each OpenCV version. Let’s say doing this, I created two directories:
~/libs/opencv-trunk
~/libs/opencv-2.4.8
Let’s go through the compilation process for the trunk version of OpenCV:
-
Create the directory where you want the output files to go:
 cd ~/libs/opencv-trunk
 mkdir release
 cd release
 mkdir installed
I’ll put mine under ~/libs/opencv-trunk/release/installed
-
Tell CMake your compilation options
cmake -DCMAKE_INSTALL_PREFIX=/home/krystof/libs/opencv-trunk/release/installed -DCMAKE_BUILD_TYPE="Release" ..CMAKE_INSTALL_PREFIX is the directory where you want the final output files. I’m also telling CMake to compile the Release (optimized) version of the library; you might (and I do) want to have Release and Debug versions available.
-
Compile!
make installYou can look under the install directory to verify that all the library files were created there.
Create a Simple Test Program
Let’s make sure our process worked.
Here’s a simple program that prints the running OpenCV version:
main.cpp:
#include <iostream>
#include "opencv2/core/version.hpp"

int main(int argc, char ** argv)
{
  std::cout << "OpenCV version: "
			<< CV_MAJOR_VERSION << "."
			<< CV_MINOR_VERSION << "."
			<< CV_SUBMINOR_VERSION
			<< std::endl;
  return 0;
}
Makefile:
CPP = g++

# OpenCV trunk
CPPFLAGS = -L/home/krystof/libs/opencv-trunk/release/installed/libs \
	   -I/home/krystof/libs/opencv-trunk/release/installed/include

# Opencv 2.4.8
#CPPFLAGS = -L/home/krystof/libs/opencv-2.4.8/release/installed/libs \
	   -I/home/krystof/libs/opencv-2.4.8/release/installed/include

all: test

test: main.cpp
	$(CPP) $(CPPFLAGS) $^ -o $@
Make sure you adjust the paths in the Makefile to match your own, based on where you installed the different OpenCV versions. Based on which CPPFLAGS line in the Makefile you leave in, you should get one of the following outputs:
OpenCV version: 2.4.8
or
OpenCV version: 3.0.0
3.0.0 is the output from the trunk version here.
So there you go! All you have to do is change one line in a Makefile, and your code gets compiled with different versions of OpenCV!